

07 - The Planning
The time had finally come. I could start planning the interior fit-out. I knew the necessary measurements and had
a rough idea of the fittings. Once again, the internet, with its seemingly endless variety, had provided the ideas
and inspiration. Now I just had to adapt them to my camper van.
Thanks to my studies in civil engineering, I was familiar with technical drawing and also had a certain degree of
spatial awareness. However, a simple drawing on paper is no longer up to date. Moreover, it lacks the third
dimension and the effort involved is immense. That's why I preferred to create the plans using a CAD
programme. After a quick search online, I came across
SketchUp.
The online tool is also available in a free version and offers everything I was looking for - from creating floor
plans to 3D visualisation with surface rendering.
After just a short familiarisation with the tool, I was able to draw the floor plan. In doing so, I was able to
make the most of two advantages of the camper van. Firstly, it has windows all round and, secondly, two sliding
doors. With camper vans, it is common practice to always have the entrance on the passenger side. This is probably
because you usually park with this side facing the kerb. I, on the other hand, planned the entrance on the
driver's side. This ensures that the view to the rear (over the shoulder) is not obstructed by a cupboard. I
also planned a pull-out bed running across the width, as this allows for the creation of a lounge area.
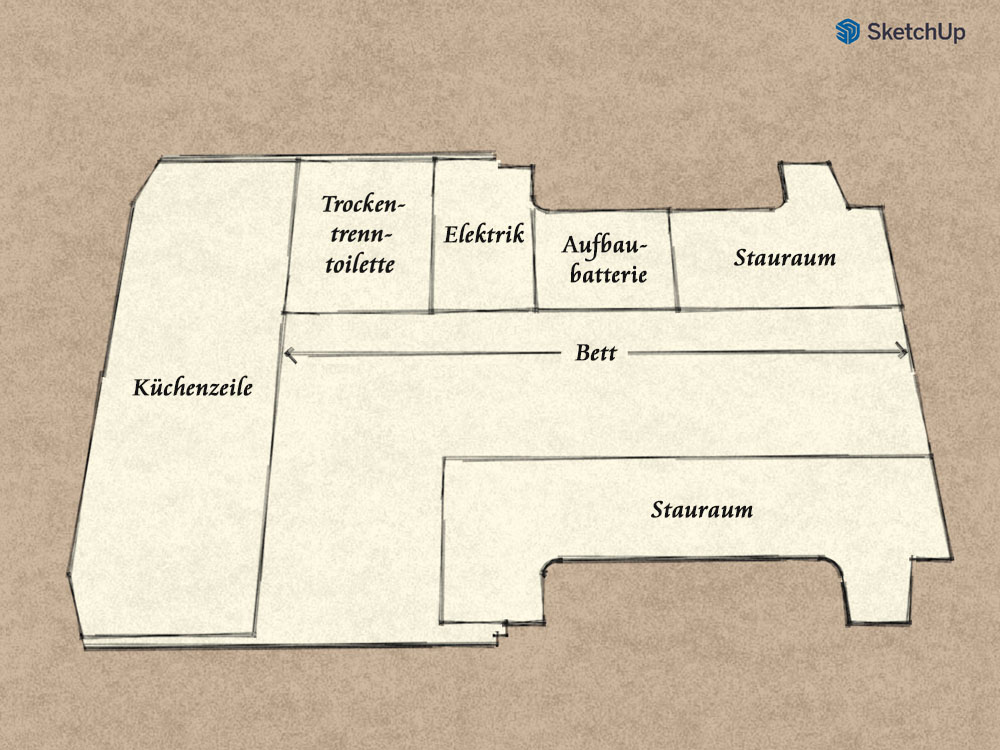
Otherwise, the planning initially only needed to take into account the essential components such as the toilet,
power supply and electrical systems. This results in a bed along the passenger side, designed to accommodate the
aforementioned components. A kitchen unit is arranged across from it. This is where the fresh and waste water
tanks, the cool box, the hob and the sink should be located. To complete the layout, a wider base unit combined
with a tall unit on the driver's side should provide storage space. The table should also be integrated here.
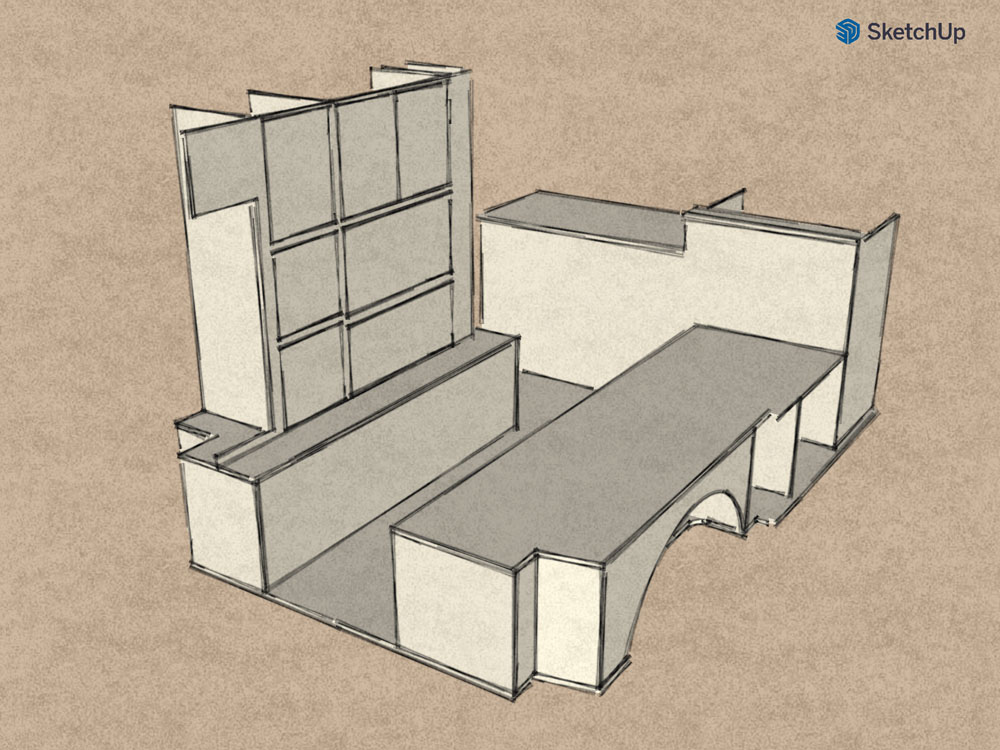
The complete fit-out was then developed from the initial floor plan, which showed the general layout. For example,
the pull-out bed needed a support structure. Furthermore, a sleeping surface 120 cm wide and at least 190 cm long
was to be created. The integration of the table into the tall cupboard, in turn, determines its position and thus
the layout of the pull-out elements by the bed. The interior height, together with the minimum height of the
dry-separating toilet, combined with the slatted base and mattress, determined the height of the bed.
Nevertheless, attention was paid to seating comfort and headroom.
Due to the dimensions of the camper van, part of the kitchen inevitably disappears behind the end of the bed. As
it cannot be accessed from the interior, this area automatically serves as a storage space for water and waste
water. It can also be used to store other items required solely for camping. The cool box had to be accessible at
all times and can only be opened from the top. It was therefore positioned above the water and waste water tanks.
The tanks, in turn, determined the position of the sink to ensure the shortest possible pipework. This in turn
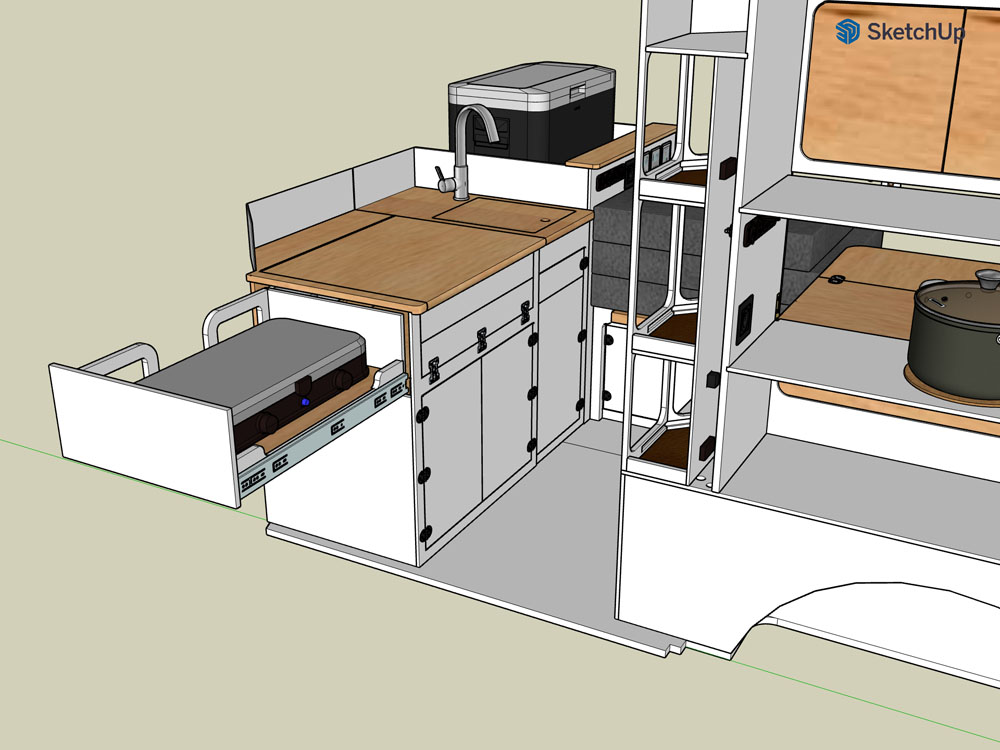
dictated the position of the hob. However, this was also planned from the outset, as the hob was to be pull-out
from the side so that cooking could also be done in front of the camper. Consequently, the layout of the kitchen
was dictated by necessity or by the desired options.
The wall unit is set back from the base unit to allow sufficient space for the desired bed width. The position of
the table then determined the rest of the layout. The table was to be at a comfortable height and offer enough
space for two to three people. An open area was then planned in the rear section to accommodate a larger rucksack.
A shelf was added near the sliding door. This could be used, for example, to store a mobile phone and various
items for quick access whilst standing.
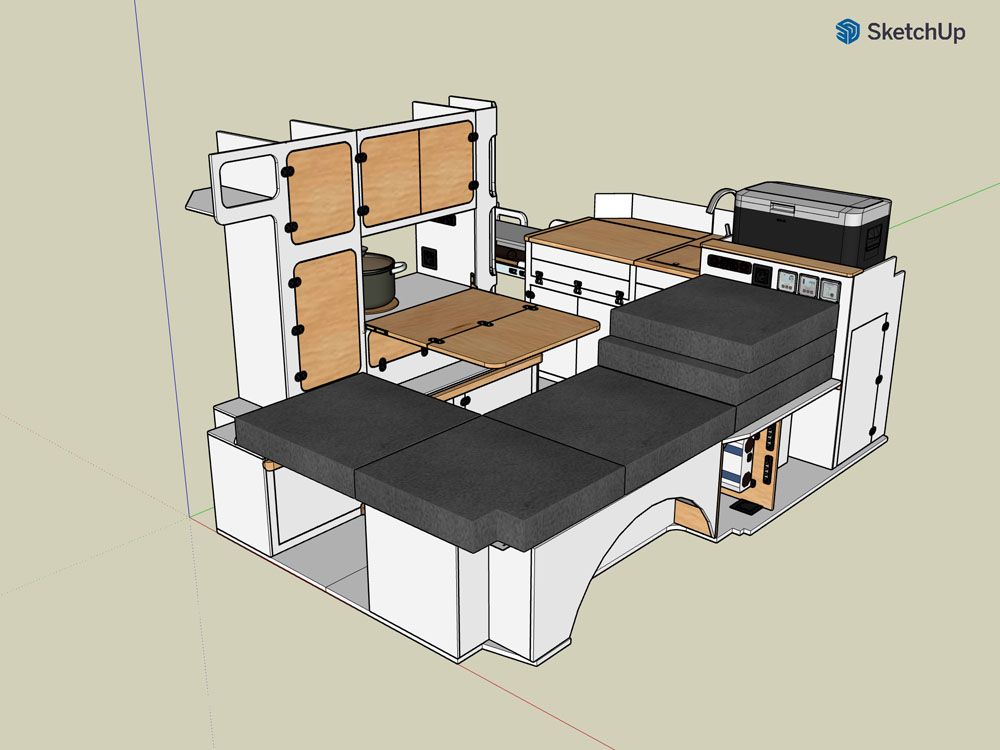
Next came the detailed planning. This was carried out gradually as the conversion progressed. For instance, the individual compartments for the dry-separating toilet, the electrical system and the auxiliary battery could only be sized once these had been designed and built. Similarly, the depth of the kitchen was adapted to the minimum length of the bed and the size of the cool box and the hob. After I met Andrea, the kitchen was redesigned once again. We wanted to incorporate a way to access the camping area from the driver's area at any time without leaving the van. This, in turn, meant that at least the waste water tank had to be repositioned. Similarly, the tall cupboard had to be adapted from the original plans to fit the contours of the van, requiring slight modifications to the individual compartments.
In the end, all storage areas were planned out and, thanks to the 3D rendering, we already had a very good idea of what the finished fit-out would look like. Furthermore, the model allowed us to determine the number of hinges, latches and handles required. The materials were cut to size at the DIY store, which meant some of the work could be omitted. Nevertheless, the doors had to be cut out and grooves milled where necessary. This was followed by an initial assembly with pre-drilling of the screw connections. Finally, the wood had to be protected against the weather and dirt. To this end, it was treated on the inside with a hard wax oil. The exterior, on the other hand, was primed and varnished twice. To make the cramped space feel a little more welcoming, white was chosen as the dominant colour, broken up by wood-effect finishes with clear varnish. For the parts subject to heavier wear, such as the worktop and table, several coats of a two-component clear varnish were applied.
Comments
Write a comment
Your email address will of course not be published.